Friday, May 29, 2009

Happy Friday!


Good morning! As you can see I am still getting up to take my DH to work. And last night I got two projects done so I have one ready to post for today already. This project is a Tri-Fold Shutter card. It turned out really cute but figuring out the folds and everything was a little interesting. I used Basic Grey card stock. I started with a 12 x 12 piece. I cut it to 12 x 6. The directions I have for this card are in cm. So figuring out the measurements for the scoring and the pieces of designer paper were a challenge. I used the Walk in the Park DSP and the Garden Whimsy stamp set with Cameo Coral and Baja Breeze card stock and ink, oh and little bit of Kiwi Kiss ink.
Here are the directions for the card. Remember they are in cm, so it might be easier to convert and then make your card. I did mine at the same time, it worked okay but took a little bit longer. The finish product is sweet. It is not a standard size, so you would need a little bigger envelope than the standard SU medium envelope. The snail and lady bugs were stamped directly onto the designer paper. The butterflies and the sentiment we stamped on card stock and then cut out and popped up on the card. The big butterfly was inked with Baja Breeze and then I used my Cameo Coral Stampin' Write marked and thumped on the image to add some Cameo Coral and then stamped it on Cameo Coral card stock. It turned out lighter than I planned but I liked the way it looked so I left it. You will see more of these cards in the future, I really like the way the look and I have some ideas on how to change it up just a little bit. Thanks for looking and hopefully I will have my Split coast issue fixed soon. Have a great day!


Come and create something with me,


Andi

Thursday, May 28, 2009

omg!

In case you follow my gallery over on Splitcoast Stampers, I did something tonight, I don't know what and all the pictures I have posted of my projects DISAPPEARED! I have sent a frantic email to Splitcoast for help. So hopefully, all will be good in the next couple of days. Sheesh! I will pay more attention next time!

TENTED THURSDAY


Good Evening fellow stampers! Tonight's project is a vertical tent card made from my favorite 2009 In Color, Pacific Point. I will be so sad when this color retires at the end of June. So you might see a lot of the 2009 In Colors in the next couple of weeks. I used the Wow Flowers stamp set. The scalloped circle punch and one nail head sticker in gold. I used Pacific Point, Baja Breeze, and Basic Black ink. Pacific Point card stock, white card stock, and Pacific Point DSP. The directions for this card can be found here. On the same blog, there are directions for making a horizontal tent card which I will be making and posting at a later day. This card was very easy to make once I figured out which way everything folded. I used a piece of scrap paper and did a practice card first, that way I didn't waste any good card stock. On the white piece of card stock, which I cut to 2 x 2. I stamped the flower from the set. I stamped it twice in Pacific Point, then I stamped off with Pacific Point and stamped the flower two more times. I stamped "birthday wishes" in Pacific Point, then in Baja Breeze, and then again in Basic Black. I adhered the white card stock to a piece of Pacific Point that is slightly larger at 2 1/4 x 2 1/4. Then I attached that to the square at the top of my tent. I placed it so that more of the lower sides is showing, which shows one of the designs from the Pacific Point DSP. I adhered another pattern of the designer paper to the main part of the tent. I used my Scalloped Circle punch and cut out Pacific Point scallop circle. Then I used the Large Fiskars circle punch and punched out a circle from the same pattern that is on the bottom of the tent. I glued my circle into the center of the scallop. Then I stamped the "happy birthday" with small flower in Pacific Point ink on white card stock and popped that up in the center of the circles. I used a gold nail head sticker for the center of the flower. This card, once I had done my practice card, only took about 10 minutes to make. These might be my June and July thank you notes.

I wanted to take a minute to say thank to all the ladies from priscillastyles, Midnight Madness challenge who have left such wonderful comments about the card I did for this week's challenge and everyone else who has left comments on my work. I get all giddy when someone leaves a comment about how they like my card, or the colors or whatever. So I just wanted to tell everyone thanks for the great feedback and keep coming back. Thanks for looking.


Come and create something with me,


Andi

Wednesday, May 27, 2009

WEAVING WEDNESDAY


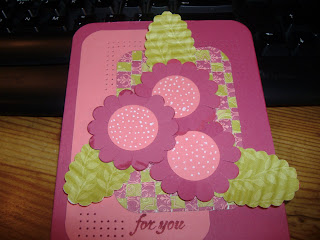
Hey fellow stampers! Today's project is almost entirely no stamping. The card stock is Rose Red, Cameo Coral, Raspberry Tart, and Walk in the Park DSP. The card base is Rose Red with the corners rounded. Cameo Coral is the longer panel also with the corners rounded. The Raspberry Tart DSP might be a little hard to notice. In this month's Stampin' Success (which the demonstrator magazine) there was an article on how to weave card stock and ribbon. So the second panel with the rounded corners is two designs from the Raspberry Tart weaved together. I also rounded the corners. I took my Scallop Circle punch and punched out three circles from Rose Red and I punched three circles using the smallest circle punch from Fiskars in Cameo Coral. I glued the circles to the center of the scallop circle. Then I cut each scallop so that it looks like a flower. I took my white gel pen and made dots on the Cameo Coral so that it looked like a flower center. I took the Scalloped Oval punch to make the leaves. I punched them out from the Walk in the Park DSP. Then I ran them through my crimper. I glued the flowers in a circle on the Cameo Coral and the weaved Raspberry Tart. I used my paper piercing on 3 of the 4 corners of the design to give it a little something more. I stamped 'for you' in Rose Red ink on the bottom of the Cameo Coral panel. I edged the flowers with Rose Red ink. This would make a nice thinking of you card or change the sentiment and it makes a very feminine birthday card. Thanks for looking. I will have the instructions on how to do the weaving, both kinds for you tomorrow! Thanks again!


Come and create something with me,


Andi

Tuesday, May 26, 2009

Some Mojo Monday to go with the Madness


I am trying to make up for my lack of posting over the weekend. I am also going to show you my Mojo Monday sketch submission. I used the "And Many Mower" set. I used Kiwi Kiss for the card base. My two panels are Baja Breeze. The Designer paper is from Walk in the Park. I used 5/8" chocolate chip grosgrain ribbon that was left from my create a calendar kit. The 'brads' in the corners of each of the panels are actual 'nail head' stickers that I bought at my local Archiver's store. I bought them in silver and gold but the come in many colors. I stamped the mower in Timber Brown StazOn and colored it with watercolor pencils that I blended with my blender pen. I center that circle on circle made from Chocolate chip card stock. I think this card will make a very nice masculine card when I need one. Watch my blog for Stampin' UP! Last Chance List (formerly known as the retired list). I will post it on my blog on June 1. The stamps on this list will be available until June 30th. The accessories that are being retired are available while quantities last. That will be posted on June 1st as well.

Tuesday Midnight Madness


I hope everyone has survived the long weekend and the first day back to work. I have a new badge on my blog. I was invited to participate in a Tuesday sketch challenge by Priscilla. She left a comment on the 4th of July card I did, with the blog spot address. So I investigated and I will be participating in this sketch on Tuesday's. I will still do Mojo Monday too. I really like taking just a sketch and making my card from there. My husband asked me what a card sketch was, I told him it was like a recipe. I decided that I like that comparison. Today's project using the Midnight Madness sketch. I used Kiwi Kiss card stock for the base. The stamp is from the SU's "That's Funny!" set. I fell in love with this set the minute I saw it. I relate quite well to my masked friend on this card. The designer paper strip is from the Raspberry Tart DSP. I used two lengths of Very Vanilla grosgrain ribbon. The buckle is an S shaped clip from the Hodgepodge hardware. This is the antique brass that was retired last year I think. I used 3 random buttons that I thought the green matched pretty darn good. The flag was run through my crimper . Just looking at this image makes me giggle. I used my Stardust Jelly Roll glitter pens to color his shirt and pants and the stars. I edged the flag with Rose Red Stampin' Write marker and the rectangle of Very Vanilla card stock that my image is on, I edged with Kiwi Kiss. I hope that the every one enjoys my submission. Check out the Midnight Madness sketch challenge. Just click on the badge on the left side of my blog. Thanks for looking and have a good night.


Come and create something with me,

Andi
Sunday, May 24, 2009

Crazy Holiday Weekend


I hope everyone had a great weekend so far. I had so many plans and pretty was lazy but I figured I would do some crafting tonight and post things as I finished them. Today's project is using last week's Mojo Monday sketch. I had this idea in my head for a 4th of July card and how to make the stars red, white, and blue. This is what I came up with. The card base is Brilliant Blue. I used the Independence Day set again. One of the stamps has swirls and stars. I used that stamp and the Silver Encore pad to create the background on the Brilliant Blue. Then I stamped happy 4th on white card stock using Brilliant Blue ink. I used the 1 1/4 square punch and then I used the punch to trim it down a little more and punch out a square of Real Red card stock and put the sentiment on that . The two big stars were stamped on white card stock. I used my Stampin' Write markers in Real Red and Brilliant Blue to color the star stamp. Then on one I took the smaller star stamp that is in the set and made an impression of it in the ink and on the other star I used the swirl set. The smaller stars are easier to see than the swirls. Then I used the firecracker stamp and stamped four firecrackers using the Real Red and Brilliant Blue. Then I took my Jelly Roll clear Stardust glitter pen and traced the firecrackers to give it a little sparkle and I tried to make it look like the wicks were lit but I don't think that showed up very well in the picture. And I didn't follow the sketch exactly but I wanted to use the stars so I hope you like it and thanks for looking. For everyone that is off tomorrow enjoy the day and check back with me I will have more projects. Have a great Sunday.

Come and create something with me,


Andi

Thursday, May 21, 2009

BLEACH-IT'S NOT JUST FOR CLOTHES


Good Morning! Normally, you will never see a post this early but my DH is having trouble with his vehicle and I had to take him to work. He is one of those happy morning people so he has to be to work at 6 AM. So now my goal is to stay awake so that I am not late for work. So onto the project.
I used the Fifth Avenue Floral set again. The card base is Baja Breeze. I stamped the background with one of the other flowers from this set and stamped them in Baja Breeze. The roses were stamped in VersaMark ink and emboss with clear powder on Pacific Point, Baja Breeze and Lovely Lilac. Then I took a small amount of regular household bleach and a cheap Aqua Painter(because once you use it with the bleach you won't be able to use for anything else) and added bleach to different parts of the Roses. Because Stampin'UP! card stock is made from recycled fibers each color has a different reaction with the bleach. The Baja Breeze rose that is on the bottom and you only see a little bit of it, I had a small problem and I am sharing to save someone else. I used my heat tool to set the bleach and I burned the bleach on the Baja Rose. The center turned brown and you can see a little bit of it. This is only one way to use the bleach technique. You can also stamp with the bleach. Fold a paper towel and added bleach to it and then use that like you would an ink. It is very important to clean the stamp right away when you are done. The bleach can eat the rubber of your stamp. Also if you use this technique, make sure you are in a well ventilated area because of the fumes from the bleach. And of course I used the sentiment from this stamp set. Thanks for looking. Have a fabulous day at whatever you are doing today. I'm going to make breakfast.


Come and create something with me,


Andi

Wednesday, May 20, 2009

REVERSE SILHOUETTE


Today's project is something I found when I was surfing websites last night. This is my first try at this technique so I now know a few things I will do differently the next time I try this. The directions for the technique can be found here. I used the Independence Day stamp set. I used Real Red and Brilliant Blue classic ink along with the Silver Encore Pads. I attached my silhouette piece to a Basic Black card that is 4 1/4 x 5 1/2. I didn't added the swirls in Silver until I had attached the silhouette to card base. I used Dazzling Diamonds glitter on the star that is in the circle that says Independence Day. I rounded the corners of the card and then used the Silver to brush the rounded edges and sides of the black card. The technique is very cool. I did use a separate brayer for the black over lay. Plus I kind of got ink all over my hands but that is the cost I pay to provide many new ideas to loyal followers...hehehe...the main thing I will change when I do this again, is this. When I brayered my inital colors onto my white card stock. I used Real Red on one end and Brilliant Blue on the other. This left a small space of white card stock showing. When you wipe away the black ink....the part that was left white kind of looked greyish, black. So next time I will color the whole piece. I decided to use black card stock to make it resemble the sky. Let me know what you think. Thanks for looking!


Come and create something with me,
Andi

Monday, May 18, 2009

And the blog candy goes to........


Well I had two lovely ladies leave comments about going into the drawing for blog candy and I realize that I should just draw a name and let it be but I can't do it. So Brenda and Gigi please send me your addresses to my email stampcrz30@cox.net. One of you will get a different stamp set but you both will get the same paper. So the drawing of names will be for the two different stamp sets. Thank you so much for your support. Now onto the project for today. Again, I started a project without really plan in mind but I like where it ended up. I used So Saffron card stock for the base and used Certainly Celery as a band across the front and then I added a pattern piece from the Sale-a-bration designer paper, Delicate Dots. I used the "Fabulous Friend" stamp from the Oval All set. I stamped it once and then I masked the words and stamped it again so that the flowers were on both sides. I like how it looks then I used the Scalloped Oval punch, attached it towards the top of the band and colored the flowers with the Red Star, stardust glitter pens. I used the Scalloped Edge punch for the bottom of the Certainly Celery. Along the bottom of the designer paper, I put the Certainly Celery ribbon from this years Sale-a-bration catalog. Then I stamped Happy Birthday on Certainly Celery card stock with Timber Brown StazOn. I added a silver eyelet and attached a mini paper clip to the oval and then ran the paper clip through the ribbon so that the oval dangles. On the inside, I stamped the sentiment from the Very Versatile set..'may your day be the wish come true kind with the Timber Brown StazOn again. Thanks for stopping by and have a great Monday.


Come and create something with me,


Andi

Sunday, May 17, 2009

SUNDAY SLOTH


I have a love/hate relationships with Sundays. I normally laze about all day and then at like 10 at night I am running around trying to get everything ready for Monday. So because I lounged all day and then rush and stay up too late I am never at my best on Monday morning. Hence today's title. Although I am posting reasonably early for me =) The project I have for you today is a thank you card that I made for another challenge I found. I will give you the details of it at the end of the post. Unlike some of the other challenges, I have found this one gives you a theme and for this challenge it was THANKS. I used once of the thank you stamps from Fun and Fast notes. The hedgehog with the butterfly. The card base is Pink Pirouette. I used the 1 1/4 square punch to create the window. I used Chocolate chip grograin ribbon that I had left from the calendar kit that was in the last Mini Occasions catalog. I attempted to make a Scalloped window frame. It turned out okay but not great, however I did figure out what I did wrong so the last time it will be great. The designer paper I used is from a couple of catalogs again, Berry Bliss. I used one of the Close to Cocoa pieces with flowers on it. I used my clear Stardust glitter pen to color the centers of all the flowers. Then I took my piercing tool and make piercing on all the little white circles that are part of this pattern. It gives it a really nice effect that might not show up very well. I stamped my little hog in Timber Brown StazOn. Then I took a brown water color pencil and highlighted the little 'quills' and then I sponged daubered Basic Brown ink on him. I used the water color pencil to color his face and then used a blender pen to smooth it out. Then I used my Jelly Roll Glaze pen to trace the butterfly and the snout of Hedgie. I put just a little color in the butterfly a water color purple. I used my Scalloped Edge punch on the right side of the opening and then I on the left I added the Chocolate Chip ribbon. This would make a really sweet thank you note for someone. Let me know what you think. And remember you have one more night (tonight) to throw your name in for my blog candy giveaway. Thanks for looking.


Come and create something with me,

Andi

Thursday, May 14, 2009

Thought Provoking Thursday


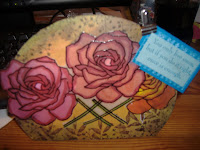
Do you ever start a project and you really don't have any destination in mind? That is what happened tonight. I wanted to use the rose from the Fifth Avenue Floral and do the stained glass technique. I wanted more than one rose so I stamped on my vellum with the rose in the centerish. Then I stamped another rose to the left and to the right. Well the one on the right, I had some judgement issues. So there was a gap. I went ahead and added my black embossing powder and used my heat tool to set the powder. I colored the roses and I added some random stems. Then I decided to cut out around the roses. Still don't' have a plan at this point. Then I thinking well maybe I could frame it....yeah no frames. Then I remembered that I pieces left over from that chipboard purse that I bought to make my god-daughter's stamp purse. I cut the handle off the purse and then covered it with white card stock. Then I started to have a little Michelle Zindorf moment and just randomly started braying color onto the card stock. A while ago, Michelle did this card with the Embrace Life set that I think became the inspiration for tonight. You can see that card here. Then I took the tree from the Very Versatile set and stamped it in Basic Black ink around the edges of the purse. Then I took the fill-in left from the Botanical Blooms and stamped those along the edges and bottom in chocolate chip. Then I attached my roses. That gap on the right was still bugging me so I stamped the greeting from the this set, "you only live once, but if you do it right, once is enough." with Pacific Point ink on Baja Breeze card stock. I framed it with Pacific Point DSP, and then solid Pacific Point card stock. Then I attached the saying over the gap with dimensionals and I added a mini-library clip for some hardware. Remember I said that cut the handle of the purse. I used my Tombow Multi-purpose adhesive to glue the handle on the back to act as stand. The more I look at it, the happier I am with the results. Thanks for looking and remember I am drawing for blog candy on Monday the 18th. So get your name in.


Come and create something with me,

Andi

Wednesday, May 13, 2009

HAPPY WEDNESDAY


Hey fellow stampers! I am posting a little later than normal because I had a tough time creating something tonight. What I finally came up with, isn't exactly what I had imagined but it is sparkly. I hope everybody likes it. I am hoping that the creativity will flow tomorrow. I used the flowers from the Fifth Avenue Floral set. I used Pacific Point card stock, Baja Breeze card stock, glossy white card stock, and water color paper. I used Basic Grey taffeta ribbon, Dazzling Diamonds glitter, the Scalloped Oval punch. I stamped the sentiment in Pacific Point ink. On the Baja Breeze card stock, I stamped one of the flowers in Versamark ink and attached it to Pacific Point card stock. I stamped the rose from the set with Pacific Point ink, I used a Michelle Zindorf trick. I inked the flower with VersaMark and then Pacific Point and then embossed with clear emboss powder. I used a sponge dauber to color the rose with Pacific Point ink. Then I added some Dazzling Diamonds glitter. The other flowers on the card are colored with Cameo Coral and Yo-Yo Yellow and Pacific Point and Baja Breeze ink. On the flower on the right, I used a blender pen to color it with the Baja Breeze and then went over it with Pacific Point and colored the center with Yo-Yo Yellow. I added Dazzling Diamonds to both flowers. I used the ribbon to frame the piece of Baja Breeze card stock. That is about it. Thanks for looking. Don't forget to enter your name for the blog candy.

Come and create something with me,


Andi

Monday, May 11, 2009

IT IS CANDY TIME!!!


I still have about 40 hits before I am at a 1000 visitors but I decided the whet the appetite. I am giving away a hostess set from last year's Spring/Summer catalog. It is called A Little Bit of Happiness(it does have the SU box). I will also be giving the lucky winner 12 6x6 sheets of Walk in the Park Designer Paper along with 12 6x6 sheets of To The Nines specialty paper. This paper is a heavier card stock that would work great for a cover to a hand made photo album. Now you are asking yourself...what do I have to do? Leave a comment asking me to enter your name in the drawing for the blog candy and tell me how you found my blog....easy see. I will draw for the candy next Monday night. So get your name in the box. Thanks for looking and happy stamping!

Come and create something with me,


Andi

Sunday, May 10, 2009

HAPPY MOTHER'S DAY


I hope everyone had a wonderful Mother's Day. Both my mom and mom-in-law got handmade cards....not that either of them expected anything less. My best friend's party was flawless and she had a great time celebrating and getting to relax. Today's project just kind of came together. I am not really sure that I like the finished product but I figured I would post and let you be the judge. I used one of the cards from the Fresh cut Notes. I created a grid background first and brayered Pacific Point ink to highlight the grid lines. I then attached that piece behind the cut out part of the Fresh cut notecard. Then I took the main image stamp from the Fresh Cuts set. I inked it with Baja Breeze classic ink and then I took the small flower from the Fresh Cuts set and stamped it over the image in Pacific Point ink, sort of a Kissing effect. Then looking at it, I decided that it needed something more so I used the Scalloped Edge punch on Pacific Point card stock. I made two Scalloped Edge borders and then used a the left over edge that you get when you use the Scallop edge punch to create sides. Then I sponged some Pacific Point ink around the Scallops. I stamped "for you" in Pacific Point on to Baja Breeze and attached in the center of the flower. Thanks for looking.

Come and create something with me,


Andi

Saturday, May 9, 2009

SATURDAY SOIREE

Good morning everyone! I don't have a project to post today. I just wanted to update....only 100 more visitors to go until I post for blog candy. I can't believe how fast the last 400 have gone. I have some of the blog candy picked out and ready but I am thinking about adding more. So when I get to 975. I will post the prize and let everyone know what they need to do. Thank you so much for visiting me. I was very unsure about starting my own blog and now I can't believe I haven't always done it. Today is the post-graduation celebration for my best friend who received her degree yesterday. We are going to eat and be merry today and enjoy the company of family and friends. So enjoy your Saturday and thanks for checking in with me today.


Come and create something with me,

Andi

Friday, May 8, 2009

FRIDAY FINALE


Good evening fellow stampers! happy Friday. Today's project is a card I created to give to a co-worker whose 20 year anniversary was today. She is also in my stamp club. I did a gate fold card. I used Pacific Point card stock for card base along with Baja Breeze card stock for the Scallop Oval. I used the Oval All set from the Mini Occasions catalog. I stamped the "thank you with the butterfly" in Pacific Point classic ink. There are little circles all around on the image. I covered those with small clear crystals. I used the Whimsy jumbo wheel to create the pattern on the front of the card. I round the corners and attached the Butterfly with dimensionals. I also used the curly label punch. With this punch I punched one in Pacific Point and one in Baja Breeze. I glued those together and then turn it and adhered the oval to it and then adhered all of this to the left side of the card. I used a flower punch and created 4 flowers using the Walk in the Park designer paper and used the crystals for the center of the flowers. I think this pretty much covers everything. You can always email with any questions. Thanks for looking.

Come and create something with me,


Andi

Wednesday, May 6, 2009

Trying to find my Zindorf


The other project that I am posting is a card that I tried to duplicate from Michelle Zindorf's blog. This is the first project that I have managed to copy that looked pretty close to Michelle's. Because I finally realized that not all brayer's are created equal. I did this project with my very own Speedball Brayer. I did add a little bit to make it mine. I took the tree image from the Very Versatile and stamped it in Basic Black in the right lower corner of the white card stock and then again above the flowers on the left side. I like to think they look like little bushes. I don't have a corner punch so I took the 1 1/4" square punch and punched a black square and then cut it diagonally in half and then cut out a corner. It doesn't look as good as it would if I had the punch but it is not bad. For the directions to this card, visit Michelle's blog here. Thanks for looking.

Come and create something with me,

Andi

All better Wednesday


Ok, got new batteries for the camera and was able to take pictures of my project from last night. This time I did some step by step because when read the directions and scored my card stock the first time...the measurements didn't measure up...sorry. So hopefully the step by step will help you make your project the without mishap. This first picture is to so you how to line your card stock up on the Scor-Pal. The card stock is 4 1/4 x 11 (I used Certainly Celery for the card base but So Saffron in the picture on the Scor-Pal). You are scoring at 4, 6 1/2, 9, & 10 1/2. But as you can see by the picture you don't line up your card stock to the very left but to the right. Once you have scored the card stock you are ready for the next step. DON'T fold your score lines yet. You will be adhering your designer papers first. I used the Delicate Dots from this year's sale-a-bration catalog. I used three different patterns for each section. The measurements first panel starting at the left is 1 1/4 x 4 then next section is blank the next section is 2 1/4 x 4 the next section is blank then final panel is 2 3/4 x 4. Now you can fold your score lines. Decorate as you wish. I used the Oval All and Very Versatile. I used the "Best Wishes" which I stamped with Bashful Blue classic ink onto So Saffron card stock. I used the new Scalloped Oval punch. I inked the edges of the ovals with Bashful blue. The next image is from the Very Versatile, that is stamped with Chocolate Chip on Certainly Celery with the edges inked. The final panel I stamp the coordinating sentiment from the Very Versatile in So Saffron ink onto white card stock so it is a little hard to see it in the picture. Then I folded all my sections and wrapped the belly band ( this 1/2" x 7") around it and clipped it with one the Library clips. I got the pattern for this card from the Scor-Pal website. www.scor-pal.com. Thanks for looking.

Come and create something with me,

Andi

Tuesday, May 5, 2009

TUESDAY TRIP-UP

I have a card already to go, I am getting ready to take step by step pictures and then it I got the evil read light.....low battery...and then no battery. Do you think I have extra batteries....nope, not even any that were semi-used. So I thought I will find my sister's camera to take my pictures....yeah no she must have it with her. Hopefully when she gets home I can at least get some pictures posted. If not, I will do a double post tomorrow night. Thanks for stopping by.

Come and create something with me,

Andi

Monday, May 4, 2009

Monday Mojo Madness


Today I am using this week MOJO Monday sketch. I used So Saffron cardstock for my base. I layered different patterns from the new Walk in the Park DSP. I used a square of the So Saffron for the most of the card. Then I used a strip of the Cameo Coral pattern. I used a piece of Baja Breeze card stock then layered a piece of the Walk in the Park DSP with the Baja Breeze pattern. Then I used a piece with all the colors in the pattern. The ribbon is from the Sale-a-bration Ribbon Bundle So Saffron. I used the Oval All stamp set which is also from the new Mini Occasions and stamped the one that says "fabulous Friend" onto Baja Breeze card stock that I punched out with the Scalloped Oval from the new Mini. I stamped the image in Pacific Point Classic Ink. Then I took my white gel pen and added some white to the flowers. I adhered it to the main card with dimensionals. I think it turned out great. Very spring like. Thanks for stopping by.

Come and create something with me,


Andi