Wednesday, December 23, 2009

Pop Out Card


 This card was actually made with the help of the Ultimate Crafter's Companion but I decided to give directions on how to do it without having that tool. I did post this same card style back in July when I first got the UCC but this has a Christmas theme and I am including more directions. Please bare with me this is the first step by step tutorial I have done. What you will need is the following:  Two pieces of card stock but to 5 1/2 x 8 1/2.  One piece is for the outside of the card and once piece is for the inside.  For my inside piece I chose to use designer series paper.  You still cut it the same but I wanted to let you know that DSP is an option as well.  To help with confusion, I will refer to the pieces as the outside piece and the inside piece.  First take your outside piece and on the 8 1/2" side score it at 4 1/4.  Fold your score lines and then decorate the front of the card.  This is an important step to do first because once you get the inside piece in the front won't be smooth and level because you stuff on the inside.  I used the Snow Swirled snowflakes and greeting which I stamped in Soft Suede.  I punched out two ornaments on the Christmas Cocoa DSP and stamped the "merry Christmas" from the Delightful Decorations set.  I used dimensionals  to attach mine so I did those last to keep from damaging them when attaching the inside.  Okay so set aside the outside piece.  Take the piece that you are using for the inside and what I did to make it easy is this.  On the 8 1/2" side, I scored it at 4 1/4 and then I laid the card stock flat with the opening to the right.  I took the 'front' and folded it back to the score line and used my bone folder to make the score lines crisper and then the did the same thing to 'back' of the card.  Now I put the card down so that the 4 1/4 score line was to the right.  I put the oval coluzzle template so that it was fold side was centered on the coluzzle (pic. 2)  Depending on big you want your opening is which oval to use.  I went 3 lines in and cut with the blade, now if you use a lot of pressure you can probably cut through both pieces of card stock but you might have to turn it over and make the ends and cut the other side.  Once you get both sides cut through, use your scissors to cut the oval out. This is was what is should look like after you cut out the oval (pic 3).  You will need to attach the inside piece to the outside piece, one side at a time.  Put down your adhesive on the left inside flap of the outside piece (pic 5), take one side of the inside piece and line it with the outside piece.  Once you have that side secure(pic 6) do the same thing to the other side.  You will see on the Christmas card that I made that I put two ornaments inside and they are hooked the top part of the pop out(pic 11 & 12).  You can make them dangle with ribbon, string, etc.  I used the small paper clip because I didn't have any coordinating ribbon.  Hope you like it and thanks for stopping by. 

Come and create something with me,


Andi


1


2


3


4


5


6


7


8


9


10


11


12

Monday, December 21, 2009

Rich Money Card holder

Hey Stampers!  Today's project was inspired by a project that Dawn Griffith posted on her blog. She made a gift card holder.  I wanted to make a money envelope so I tweaked the measurements to make a money envelope.  I did it in non-traditional colors.  I used Rich Razzleberry as the base.  All the stamped images came from the Delightful Decorations stamp set.  I made the belly band from Bermuda Bay card stock.  I was very happy with the combination.  What I did to make the envelope was ruin about four pieces of plain white card stock before I got a workable template which was accidentally thrown away I think.  So this is my template now.  Any way,  the finished size of the holder is 6 1/2 long by 3 2/16 wide.  I cut the Razzleberry card stock to 7" wide.  I scored 1/2" on both sides.  The card is 8 1/2" long.  I scored it at 2 9/16 and again at 5 13/16.  I cut the score lines off so that all the was left on the card stock was the score lines on the middle section.  I used the ornament punch to create the opening in the holder.  I used the snowflake from the Delightful Decorations to create my own pattern on the paper.  I stamped the Joy and To/From ornaments and use the ornament punch to punch them out.  It adhered them together and added them to the top of the belly band.  Once I adhered the flaps together, I wrapped the belly band around the envelope and glued it shut.  I did it this because it creates a snugger fit.  I hope you like it and thanks for stopping by. 


Come and create something with me,


Andi

Sunday, December 20, 2009

See how it Sparkles


Hey stampers! Tonight's project is what I have decided to duplicate and make for my personal Christmas cards...yes I realize what the date...so they will be more like New Year's cards but anyone.  I used Bashful Blue card stock as my base.  My next layer is Night of Navy and then I used Whisper white to stamp the snow flakes from the Snow Swirled set. I stamped the snowflakes in Night of Navy, Bashful Blue, and Brocade Blue.  I stamped the words 'sparkle' and 'be merry' with the Silver Encore ink. Once the ink dried I cover the whole piece with versa mark and covered the project with Iridescent Ink embossing powder.  Used my heat tool to set the powder which provides a gorgeous sparkle.  I put a clear button in the bottom lower right corner cuz I kind of cooked the powder a little too long.  The silver 'brads' are actually stickers that I have on hand but aren't SU.  I stamped Season Greetings on the inside with the silver encore ink again.  I love it and hope you do to.  Thanks for stopping by.


Come and create something with me,


Andi

Saturday, December 19, 2009

Bermuda Bay Christmas

Hey Stampers!  I have been competing in a contest with my demos only group.  The contest is to post something every day.  We started last Saturday and I have posted a new project for the contest and then have been posting it the next day on here.  So this is like a bonus post because I technically have already posted today.  But what the heck it is Christmas.  This project I also submitted for a challenge in my group.  The challenge was to make a Christmas card and use non-traditional colors.  The card I shared with you yesterday used non-traditional colors as well.  The tree image and the sentiment are from the Snow Swirled set. (Have I mentioned how much trouble I will be in if this set gets retired.).  I used Bermuda Bay card stock and ink along with Rich Razzleberry card stock and ink.  The accessories I used were the Scallop Edge punch and the Scalloped Oval.  The ribbon I used is actually retired and I think the color is Taken with Teal or Tempting Turquoise but when I put it against the Bermuda Bay I was happy to see how well it matched with the ink color and card stock.  My card base is your standard 4 1/4 x 5 1/2.  I cut the Rich Razzleberry so that just the tiniest bit shows between the layers of Bermuda Bay.  I wanted just a little extra pop of color.  I stamped the tree image three times and got my layered look by masking the center tree and then stamping the outer trees.  I stamped the trees on whisper white and adhered it to a piece of Bermuda Bay.  On the right side of that layer I used the Scallop Edge punch so that just a little more of the Razzleberry shows.  I attached the ribbon to close to the bottom of the trees.  Then I stamped my greeting in Rich Razzleberry onto the Bermuda Bay card stock and punched it out with the Scalloped oval punch.  Then I used dimensionals to attach my oval to the ribbon.  I did stamp the other sentiment from the Snow Swirled set on the inside of the card in Rich Razzleberry but I couldn't get a clear picture of it.  Maybe Santa will bring me a new camera for Christmas.  Okay so I hope you enjoy this project and thanks for stopping by. 

Come and create something with me,


Andi

All kinds of creating going on!


Hey stampers!  This is going to be a crazy busy weekend.  I am going to keep posting projects.  I need to make Christmas cards, cookies, and wrap presents.  Plus for some reason, my husband and animals think they should have attention, crazy huh!  Anyway, on to the project.  I got my color inspiration for this project from some wrapping paper that I purchased from God-daughter's school fundraiser.  I used Green Galore for the card base.  I stamped the 3 snow flakes from the Snow Swirled stamp set.  (I am in big trouble if this gets retired).  I stamped them in Real Red, Pretty in Pink, Green Galore, Kiwi Kiss (retired), and Gold Encore ink.  I used Real Red 1/4 grosgrain ribbon and made two rows towards the bottom of the card.  I stamped the greeting in Real Red ink onto Green Galore card stock and then punched it out with the Scalloped Oval punch.  I stamped the "May the true....." sentiment on the inside in Real Red ink again.  Then I took my "shimmer mist" and misted it on the card stock to give it some shimmer.  I wasn't sure I would like this color combination but I really like this non traditional approach to Christmas cards.  You might see more of this style.  Thank you for stopping and visiting me.


Come and create something with me,


Andi

Friday, December 18, 2009

On the 7th Day before Christmas---I am still not ready.


Hey stampers!  I must warn you this post is most non Stampin' UP! products.  Since the company changed the policy for the demonstrators back in October, I have tried to post at least 99% SU products.  I am hoping that if anyone sees this post they will give me a break.  This card was a labor of love that was made by my sister.  She saw this card in a card making magazine.  She spent about an hour on eBay looking for the Santa face.  The card stock and ink are Stampin' UP!  But I had to post it because in real life it was absolutely gorgeous.  She made it for a friend of hers that loves Santa Claus.  The was a very labor intensive card so it isn't one that could be made quickly but if you only needed a few cards or are one of those people who plan way ahead, you could do it.  I think the magazine was Paper Creations.  I will check with her and post the name.  Thanks for looking.  I will have a Stampin" UP! project later. 


Come and create something with me,


Andi

Wednesday, December 16, 2009

On the 9th Day before Christmas

Hey stampers! Today’s project uses a stamp set that I haven’t inked in a while. The Holiday Lineup. The lineup with the snowmen is my personal favorite from this set. Last year, I made several cards and projects with it and considering that I haven’t really began to make my own personal Christmas cards, the more cards I make to post the less Christmas cards I have to make over the weekend. Anyway, my card base is Night of Navy card stock. I stamped with the snowflake from the Scandinavian Season (that is retired). I stamped it in Silver Encore ink. The snowmen are stamped in Night of Navy ink on Bashful blue card stock. They are framed with Night of Navy cardstock. The pattern paper is Bashful Blue that is from one of the 6x6 pads that was a hostess gift. I used Basic Grey taffeta ribbon. I ran it the length of the patterned paper and then took a smaller piece and tied a bow. On the inside, I stamped “season’s greetings.” I did very little coloring on this image. I colored the nose with Only Orange. The gloves are Real Red; I used a brown water color pencil for the arms. I used a white gel pen to color in the balls and trim for the hats. You might start seeing these guys again for the next couple of days anyway.Thanks for stopping by.
Come and create something with me,


Andi

Tuesday, December 15, 2009

Hey stampers! Today’s project is another Christmas card. I used Real Red textured card stock and did a gate fold on it. My circle is the 2nd largest circle on the Coluzzle and it from the Christmas Cocoa designer series paper. This is one of the designs that has the felt on it. I stamped the Joy decoration in versa mark on the Red card stock and embossed it with Gold Embossing powder and centered in the circle. I stamped the snowflake from the Delightful Decoration with Gold Encore ink and then I stamped the “merry Christmas” with the star in Versa mark. On the inside I stamped “welcome Christmas into your heart” and more snowflakes. Thanks for stopping by.

Come and create something with me,


Andi.

Monday, December 14, 2009

Edited to Add:

It has come to my attention that the link I provided to get the calendar that I used for my desk calendar isn't coming up on the newspaper website so if you would like the PDF file for this and cannot find it please email me at stampcrz30@cox.net and I will happily send you the document. 

Sunday, December 13, 2009

11 days to Christmas----are you ready?


Hey Stampers!  Today's project using a card sketch from Gretchen Barron's blog.  I am loving the heck out this stamp set and the paper. I used the Delightful Decorations stamp set, the ornament punch, and the greeting from the Snow Swirled.  I used Soft Suede, Real Red, Christmas Cocoa Designer Series paper.  I stamped the Joy ornament on whisper white card stock with Soft Suede ink and punched it out with the ornament punch.  I punched two more ornaments out of the Christmas Cocoa paper.  I took a piece of Real Red card stock and glued it to a piece of Soft Suede card stock.  I took two pieces of Real Red grosgrain ribbon and adhered them about 1/4 in. apart.  I stamped the "Season's Greetings" on whisper white with Soft Suede ink. I punched it out with the Scalloped Oval punch and attached it in the center of the ribbon with dimensionals.  I put two metallic red brads on the oval.  The brads are the only non SU product I used on this card.  The pattern on the real red card stock is one of the snowflakes from the Delightful Decorations stamp set.  I stamped it first with Soft Suede and then went back with Versa mark.  I put the Soft Suede onto a piece of whisper white card stock to finish the card.  Thanks for stopping by today. 

Come and create something with me,


Andi

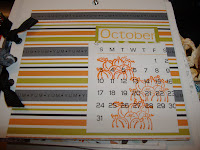
2010 Desk Calendar


hey stampers!  This project is my version of 2010 Desk Calendar. 
This is just my first draft and I already ideas on how I will change it when I do the next one.  The calendar template came from our local newspaper and you can find it as this site www.omaha.com\living.  The paper originally did this desk calendar using an empty CD case.  But I used a different concept.  The white card stock is from my designer series paper packet.  The back piece in every designer series paper is heavy card stock similar to poster board so I just used that cut in 4x4 squares.  On most of the months, I used designer pattern paper, unfortunately most of it is retired but I am getting good use out of it.  On January, I used a 3.5 x 3.5 piece of Night of Navy that I stamped with Silver Encore ink and used the snowflakes from the Snow Swirled set.  I punch 3 holes on left side of the 4 x 4 base with my Crop-a-dile and tied Basic Grey taffeta ribbon in one.  I also stamped some snowflakes on the white.  On February, I used Candy Lane DSP and used my Heart to Heart punch an d added 3 hearts to the top left and bottom right corners.  I used Real Red grosgrain ribbon on the side.  On March,  I used some pattern paper that was a level 1 hostess gift.  It is Old Olive pattern paper.  I made the Shamrock by punching a Scallop circle and cutting 4 hearts from the scallop with this month I moved the ribbon to the right side and used different retired ribbon that I got from an SU demo blow out sale.  The green crystal is the only non SU product.  On April,  I used the designer paper from last year's Sale-a-bration, Delicate Dots and some of the So Saffron ribbon bundle from that same promotion.  The bunny is from the Eight Great Greetings and I just colored her dress and eggs and popped up with dimensionals.  On the month of May,  I used the Walk in the Park paper.  The ribbon is from the blow out sale and Saleabration.  The flower 'pot' is the ornament punch.  I punched it in textured Old Olive card stock and then cut the bottom off.  The flowers are punched with the Three Flowers punch on the So Saffron pattern of the 6x6 hostess pad that I have left over.  I took my Yo-Yo Yellow marker and made a dot in the center of the flowers to give some depth.  With June,  I used a Simply Scraping kit that I have some left overs from .  I moved the ribbon back to the left and used one big gold brad that I had on hand.  July is Brilliant Blue card stock with Stars wheeled across the bottom in Versamark.  Then I punched 2 stars with the Large star punch with Real Red textured card stock and glued them on.  I used 3 crystals that aren't SU products.  I put a red one over the 4th of July and then two white crystals on random stars.  I used two pieces of Real Red grosgrain ribbon on left side.  On August, I used the leftovers from the Simply Scrappin' kit.  September is more leftovers from the same kit.  On October, I used last season's Halloween designer paper.  I used black grosgrain ribbon and some Basic Grey ribbon.  The pumpkin stacks are from the Loads of Love accessories set.  November is the only month that I didn't put ribbon on the edge.  That is mainly because I don't have a lot of SU fall color ribbon.  So I used one piece of the Chocolate chip satin ribbon and the designer paper is from last year's holiday mine Autumn Vines.  I stamped 'happy harvest' and the pumpkins again from the loads of love accessories set.  And finally, December I took the coluzzle and cut a 3" circle and used the round tab punch to make it look like an ornament.  I stamped the present stack from the Loads of Love again.  I used Real Red grosgrain ribbon and some non SU ribbon that I had on hand.  So I realize for me this was a very 'windy' post but I love the idea of these calendars so I will be making more.  Thanks for stopping by and have a relaxing Sunday.

Come and create something with me,


Andi

Saturday, December 12, 2009

On Dasher.....

Hey stampers!  Today's project uses the borrowed Dasher stamp again.  I also used the Christmas Cocoa DSP, Soft Suede, Real Red textured card stock, Chocolate Chip Satin ribbon (retired), my Scallop circle punch, the Scallop Edge punch, Soft Suede and Real Red ink.  Other accessories that I used are the Coluzzle to cut my circles and a non SU scallop punch that my sister has.  I stamped Dasher on Very Vanilla card stock with the Soft Suede and the cut him out using the circle template from the Coluzzle, then I used the non SU Scallop circle punch to create a slightly larger scalloped circle out of textured Real Red card stock and then used the coluzzle again to cut another circle out of the Christmas Cocoa designer paper.  I layered all of those together and then I took 4 x 5 1/4 piece of Soft Suede card stock and adhered a piece of the Chocolate Chip Satin ribbon to the middle and then attached my circles on the left side and then I stamped using the smallest snow flake from the Snow Swirled set using real red ink.  Then I used the Warm Words set and stamped "be merry"  in Real Red on Very Vanilla card stock and then I inked Dasher's antlers and stamped once above and below the 'be merry' and then used the 1 3/8 circle punch to cut it out and then adhered it to a Real red Scallop circle.  I used a Stampin' dimensional to adhere it to the Soft Suede base and then I attached the Soft Suede piece to a 4 1/4 x 5 1/2 piece of Real Red card stock that I used the Scallop edge punch on both the top and bottom piece of the card.  On the inside in Soft Suede, I stamped "welcome Christmas into your heart" from the Heard from the Heart set (no picture, sorry).  I really like how it turned out and I will probably make some more to use as my personal Christmas cards. Thanks for stopping by and taking a look.  Have a great weekend. 


Come and create something with me,


Andi

Thursday, December 10, 2009

Sparkle and Shine


Hey Stampers!  Today's project is one that uses the Sparkle & Shine(116542) wheel from the Holiday Mini Occasions catalog.   I have seen several blogs where the artist(cause really that is what we are) has taken the rubber from the wheel and used a clear block as an alternative way to stamp the image.  i love the wheels but I don't use them a lot because I don't always like the way the image stamps.  So I decided to take the plunge with this wheel figuring at the worst I would hate and figure out a way to put it back on the plastic of the wheel and at the best like the way it works.  So this is what my "stamp" looks like (top left).  I like the way it stamps this way better but I do need to get a longer acrylic block.  I have discovered since trying this that you really can't put back on the plastic wheel and I am not going to do this with all my wheels but I really liked the image on this one and that is why I tried it with this.  Ok, onto the project.  I started with 8 1/2 x 11 piece of Night of Navy card stock which I cut at 4 1/4 on the 8 1/2 side.  I scored my card stock at 5 1/2 on the 11" side.  I folded the score line and then I took my Scallop Edge punch and used it on both the top and bottom edges of the card. Then I took my stamp and inked it with Silver Encore ink and then sprinkled that with some special embossing powder that I have that gives it a 'tinsel' look.  Then I took my Basic Grey taffeta ribbon and added that to the card under the image and added a bow.  On the inside I stamped "welcome Christmas into your heart"  from the Heard from the Heart set that is the Fall/Winter catalog.  This is really a clean and simple card but is a little more labor intensive because of the embossing that needs to be done but other wise it is very simple.  I hope you like it and thanks for stopping by.  The pictures got a little out of order sorry about that.


Come and create something with me,


Andi